


Microsoft Exchange based email system offers the users provision to work offline in Outlook even when connection with the server is not available. This is made possible by the OST feature offered with MS Exchange. All the work done offline is saved in OST file and later on synched with Exchange mailbox when connection is reestablished. OST file, though being a server component, resides at client’s system and is susceptible to a number of corruption issues.
This write-up describes how a corrupt OST file can be repaired using native Exchange tool Scanpst.exe and how the recovered data can be restored to a PST file. To put it in another words, after reading this write-up you will be able to perform OST to PST conversion using native tools.
But, in case this method fails to recover the OST data to your satisfaction, you can use professional third-party tool to achieve perfect result. First, let’s see how to achieve this without any additional investment in third-party software.
- 1. Locate and run Scanpst.exe to repair corrupt OST
Follow these steps to locate and repair OST file on your system.
- a. Close Outlook application if it is open.
- b. Use Show hidden files, folders and drives option to view Scanpst.exe file, as, by-default, it remains hidden unless this checkbox is selected.

- c. Double-click on the Scanpst.exe file to run the utility. Location of this utility depends on the version of Outlook you are using. Use search option if you are not sure about the location of the Scanpst.exe.
- d. Browse the concerned OST file to add to the utility. Location of the OST file depends on the version of Outlook you are using. Use search option to find the location of the concerned OST.

- e. Click Start to scan the corrupt OST file.
If errors are found at the end of the scanning process you will be prompted to Repair the errors. If you are trying to convert a healthy OST file to PST you may not encounter any errors after scanning.
- f. Click Repair to start the repairing process. You will be prompted to create a backup of OST file before repairing. Provide the name of the backup at specified field.
- g. Click OK, when the repairing gets over.

This process completes the repairing of the OST file, now you need to recover and restore the OST data to a new PST.
- 2. Recover and Restore OST data to a PST file
After running the Scanpst.exe utility, launch Outlook application. Turn on the Folder List view under View menu if it not already turned on.
- a. Click on Lost and Found Folder in left navigation pane. This folder usually contains list of all recovered items from OST file.
Next, you need to create a new PST file. Recovered OST data will be transferred to this newly created PST file. The process of creating new PST depends on the Outlook version you are using.
Option for creating new PST is under File menu of Outlook. Determine your Outlook version and accordingly create a new PST for your profile.
- b. Now, you can see a new folder in Outlook by the name you created the PST.
- c. Drag and Drop the items from Lost and Found folder to this new Folder.
After you have completely transferred all the data from Lost and Found folder to new PST, you can remove them from your Outlook profile.
Navigate to the new PST location to get your OST data in PST format.
However, it has been widely seen that this process fails to recover all the data in case of severe OST corruption issues. You need to use professional third-party software to recover data from a severely damaged OST to PST.
Lepide Exchange Manager is a professional third-party Tool that can be used to perform OST to PST conversion. It can repair severely damaged OST files, and restore data to a new or existing PST.
Here are the steps to perform OST to PST conversion using Lepide Exchange Manager:
- 1. Launch Lepide Exchange Manager and add the concerned OST file as Source to the Lepide Exchange Manager. For this, click Add Source and select Offline OST file from options. Click Next and Browse to add the concerned OST file.
You will see that OST file has been added to the left-pane of software. You can expand the source and see all the recovered data within OST.

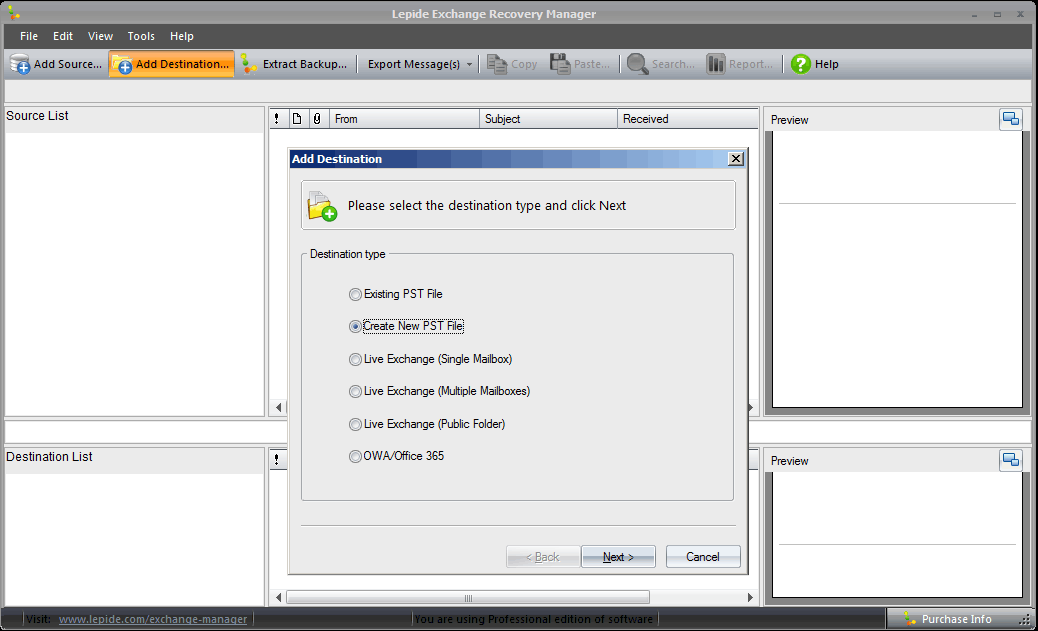
- 2. Now, you need to copy the recovered OST data to a new or existing PST. For this, Click Add Destination and select Create New PST file or Existing PST file from the options as per requirement.

- 3. Let’s say you want to create a new PST, so, select Create New PST file option, click Next, specify the location of new PST and click OK.
- 4. Copy the entire OST or selected Folders/Messages from OST and paste it to the new PST file.


Now, open the folder where you created the new PST file and you have your OST data in PST format.
Lepide Exchange Manager can tackle severest of OST corruption issues and convert OST to PST without fail in simple-to-follow steps. This is the best tool to rely on when all other methods fail.
Apart from this, software can also be used for major Exchange related functions such as EDB repair, EDB to PST conversion, Exchange Migration, Backup Restoration, Exchange server and backup search, granular message restoration, export and import messages in MSG and EML format etc.For more information - http://www.lepide.com/exchange-manager/restore-ost.html

0 comments :
Post a Comment