Tuesday 12 May 2015

Steps for Ensuring a Smooth Exchange Server Migration

Migration from an old Exchange Server to newer Exchange server or to Office 365 can be easier with well-planned Exchange Server Migration process. Now almost all organizations are giving up the old running Exchange Server and turning to the most demanding higher versions of Exchange sever or to Microsoft Office 365.

If we think about the old traditional migration process which was full of all complex, technical, manual command process and also was time consuming. But now it is the time to think about some advanced or automated process which are much easier, less time consuming and also eliminate the cost associated with resource consumption and management overhead associated with it.

Fortunately, there are some things you can do to increase your bets and improve the chances of a smooth migration.

1. Strategic Planning and Deployment

The first thing to do is to plan your Exchange Server Migration process well in advance as some times unplanned up-gradation of Exchange Server are complicated or not possible as all.

2. Exchange Migration Timeline

Even the most efficient Exchange migration options may cause downtime. So for a smooth migration process it is important to put together your plan, account for the appropriate time and the potential for lost business capacity.

3. Back up and Verification

It is always a wise advice to create complete backup when moving vast quantities of data, as small errors can occur. So it is better to have a service that offers backup as a standard operating procedure.

4. Estimate the Amount of Time And Cost

For a smooth migration ensure and try to estimate the amount of time and cost associated with the migration process. If you are planning to do a hybrid migration then it may take time and you have to migrate users in batches.

5. Think about Migration Infrastructure

It is very important to think about infrastructure requirements. Technically, the Exchange Server Migration process can run on virtual hardware, but using a virtualized migration server tends to perform badly and may create problem.

6. Exchange Server Migration Method

Choose an appropriate migration method which is the most important thing you can do to ensure a smooth migration. Some unreliable sources in your surrounding might lead you to believe that migration process can be completed in some easy steps. But in reality you have to choose the best Exchange Migration Services.

7. Security, Data Lost and Reliability Concerns

Security and reliability are most important concerns as you are about to store highly critical information to a new place.

8. Migrate Your Data


Now it is time to start up the plan and configure it to migrate your data. You should also take advantage of the available automated tool to do the Exchange Server Migration. Lepide Software Pvt. Ltd. offers one of the most professional tools for Exchange Migration i.e. LepideMigrator for Exchange (http://www.lepide.com/exchangemigrator/). This professional tool lets you to do migration from any Exchange Server to Office 365, Public Folder Migration and also help to do Intra-Cross forest migration. That is why a professional tool like LepideMigrator for Exchange is recommended for Exchange Server migration.

Wednesday 6 May 2015

Dealing with Routing Issues While Migrating from Exchange 2003 to Exchange 2010

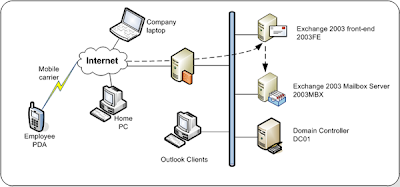
While transitioning from MS Exchange Server 2003 (the older Exchange version) to MS Exchange 2010 (the upgraded version), Exchange database administrators often get worried handling the routing issues that arise out of migration failures. Though all the migrations undergo vigorous testing procedures aimed at detecting potential technical issues beforehand, one of the most common Exchange migration issues faced by enterprises is when messages cannot be delivered from the old to the new Exchange Server.

 This blog discusses how one can deal with routing issues while migrating from Exchange 2003 to Exchange 2010.

Understanding Mail Routing in MS Exchange Server 2003 & 2010

Mail Routing is basically a technique that facilitates an organization to keep track of all the important emails by routing messages received from users and external sources to their final destinations. The Routing Engine in an Exchange Server uses the Link State information for mail routing and forwards this information to the Advanced Queuing Engine. Apart from this, the routing engine is also responsible for routing the message communication to both inbound and outbound destinations.

While MS Exchange Server 2003 uses the concept of Routing Groups for routing SMTP messages, Exchange Server 2010 uses the Active Directory site for exchanging information. Now, let’s have a quick look at the routing comparison between different MS Exchange Server versions.


Exchange Server 2003 Exchange Server 2010

Dedicated bridgehead server Hub Transport Server

Routing Group Active Directory Site

Routing Group Connector IP Site Link

Cost of Routing Group Connector Cost of IP Site Link


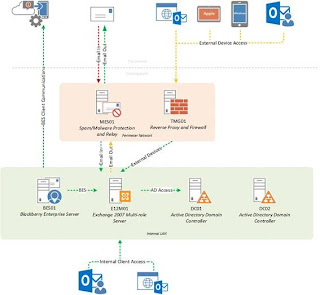
In MS Exchange 2010, the routing decisions are made during message categorization which is a technique that uses Microsoft Exchange Transport Service during message processing. After resolving the information about the recipient, the routing component of the categorizer then identifies the final destination for the message. However, the route to that destination is determined by selecting the next segment/hop for the message relay and this information is finally resolved to a list of physical servers and IP addresses.
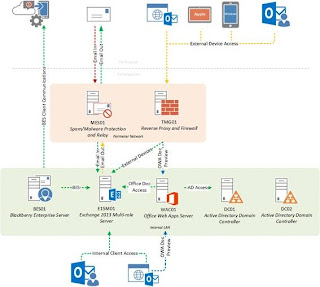
Also, in Exchange 2010 the message-routing topology is based on IP site links and the routing is automatically configured so that you don’t need to manually configure any routing group connectors. This is made possible because Exchange Server 2010 automatically creates internal Send connectors on Hub Transport Servers that are essential for facilitating the mail flow within the organization and outside.

Routing of messages actually occurs after you install the first Exchange 2010 hub transport server and when the existing Exchange 2003 server is prompted by the installation wizard. The new routing group connector uses that as the bridgehead server while the entire exchange 2010 servers are a part of the same routing group and make use of Active directory sites for routing. As soon as the installation of the first exchange 2010 hub transport server is finished, mails can be exchanged between the two servers (Exchange 2003 and Exchange 2010) via the routing group connector. And this is how the routing of messages takes place.

Resolving the Routing Issues During the Migration

Upgrading the Exchange Server from version 2003 to 2010 is a challenging task since Exchange 2010 comes up with completely different set of features as compared to Exchange 2003. While taking the transition, it’s common that you encounter routing issues that are extremely troublesome to tackle especially if you’re not following the industry best practices concerning data exchange. As a consequence, the message flow between Exchange 2003 and 2010 gets blocked and communication is not properly done between the two servers. This issue primarily occurs when the SMTP communication breaks with Exchange Server 2010 while configuring Exchange 2003 Server smart host in order to route emails.

To resolve the routing issue between the two servers, you should first proceed towards creating a new SMTP connector with some configuration settings so as to allow proper flow of messages between Exchange Server 2003 to 2010.

To help you avoid any migration routing issues while taking the transition, we’ve listed below the sequence of steps that must be followed for smooth data exchange.

Step 1 – Create a new SMTP connector for your routing group by navigating to the Exchange System Manager following the below hierarchy. Remember that the Exchange organization must be configured in order to display routing groups and administrative group options.

Go to Administrative Groups -- Desired Administrative Group -- Routing Groups -- Connectors -- Right Click to Select “New” -- Click SMTP Connector.


Step 2 – By default, the options from the General Tab will be displayed in the Properties window that is popped up before you. Enter the desired name you want to give to your SMTP connector by entering text in the Name field. Having done this, enable the option to “Forward all mail through this connector to the following smart hosts” and add the local bridgehead for the connector by clicking the “Add” option below. Now, the default SMTP virtual server will be displayed as the local bridgehead for connector as shown in the diagram below.


Step 3 – Next, navigate to the Address Space tab and specify the SMTP address space as * along with its cost. Then, select the connector scope as “Entire Organization” or the “Routing Group” whichever is suitable to you and click “OK”.


After you accomplish all the above steps successfully, you must check if any other setting needs to be changed in the Exchange Recovery Manager. In order to resolve the routing issue, you can also try removing the smart host configuration completely to check whether the mail flow is working fine or not.

If you’re still facing the Exchange 2003 to 2010 migration routing issue and are unable to figure out what is wrong with your Exchange configuration settings, then you must proceed towards taking help from third party tools like LERM (http://www.lepide.com/exchange-manager/) that provide advanced migration solution for quicker exchange while migrating the databases from older versions to advanced versions.

In addition to this, another tool that you can consider is LepideMigrator for Exchange (http://www.lepide.com/exchangemigrator/) that offers customized mapping of mailboxes between source and destination while also helping in coexistence management. With real time coexistence support offered by LME, the routing of messages between the two exchange servers will go smooth even during the migration period. Any kind of modifications or addition of new items such as email calendar, schedule, contacts or other content on one Exchange Server will also be visible at the upgraded server since LME also facilitates effective data synchronization both ways – from source to destination and destination to source.

Thursday 3 July 2014

How to perform Exchange migration from Exchange 2003 to Exchange 2013

Exchange Server has diverse roles such as Client access, mailbox management, hub transport, unified messaging etc. Many a times, system admin needs to shift few files from one Exchange to another and in other times, everything must be migrated. Suppose, your company is shifting all employees from one Exchange server to another or there are more than one Exchange Server deployed on your organization, you might like to shift few data in that case.

How to perform direct migration from one Live Server to another


Migrating Exchange mailboxes from one Exchange server to another is a common requirement that most of Exchange administrators have to deal with. MS Exchange allows moving mailboxes from one Exchange server to another if both source and destination servers are members of the same Organization and Administrative Group. Another criterion is that destination servers must belong to the same version as the source server or a higher Exchange version.

Preparing public folder migration to exchange 2013

By setting up Public Folders in Exchange Server and facilitating shared access to them, Microsoft has introduced a very convenient way to collect, organize and share information within a work group or organization. Though there were some significant changes in the design of Public Folders, they exist in Exchange 2013 also. Now a days Microsoft encourages the usage of SharePoint for collaborative works space. However, Exchange users seem to be very comfortable with the usage of Public Folders.

Friday 23 August 2013

How to convert damaged OST file to PST?

Microsoft Exchange based email system offers the users provision to work offline in Outlook even when connection with the server is not available. This is made possible by the OST feature offered with MS Exchange. All the work done offline is saved in OST file and later on synched with Exchange mailbox when connection is reestablished. OST file, though being a server component, resides at client’s system and is susceptible to a number of corruption issues. 

This write-up describes how a corrupt OST file can be repaired using native Exchange tool Scanpst.exe and how the recovered data can be restored to a PST file. To put it in another words, after reading this write-up you will be able to perform OST to PST conversion using native tools. 

But, in case this method fails to recover the OST data to your satisfaction, you can use professional third-party tool to achieve perfect result. First, let’s see how to achieve this without any additional investment in third-party software.
  1. 1. Locate and run Scanpst.exe to repair corrupt OST

Follow these steps to locate and repair OST file on your system.

  1. a. Close Outlook application if it is open.

  2. b. Use Show hidden files, folders and drives option to view Scanpst.exe file, as, by-default, it remains hidden unless this checkbox is selected.
  3. c. Double-click on the Scanpst.exe file to run the utility. Location of this utility depends on the version of Outlook you are using. Use search option if you are not sure about the location of the Scanpst.exe.

  4. d. Browse the concerned OST file to add to the utility. Location of the OST file depends on the version of Outlook you are using. Use search option to find the location of the concerned OST.
  5. e. Click Start to scan the corrupt OST file.

If errors are found at the end of the scanning process you will be prompted to Repair the errors. If you are trying to convert a healthy OST file to PST you may not encounter any errors after scanning.

  1. f. Click Repair to start the repairing process. You will be prompted to create a backup of OST file before repairing. Provide the name of the backup at specified field.

  2. g. Click OK, when the repairing gets over.
This process completes the repairing of the OST file, now you need to recover and restore the OST data to a new PST.

  1. 2. Recover and Restore OST data to a PST file

After running the Scanpst.exe utility, launch Outlook application. Turn on the Folder List view under View menu if it not already turned on.

  1. a. Click on Lost and Found Folder in left navigation pane. This folder usually contains list of all recovered items from OST file.

Next, you need to create a new PST file. Recovered OST data will be transferred to this newly created PST file. The process of creating new PST depends on the Outlook version you are using.

Option for creating new PST is under File menu of Outlook. Determine your Outlook version and accordingly create a new PST for your profile.

  1. b. Now, you can see a new folder in Outlook by the name you created the PST.

  2. c. Drag and Drop the items from Lost and Found folder to this new Folder.
After you have completely transferred all the data from Lost and Found folder to new PST, you can remove them from your Outlook profile. 

Navigate to the new PST location to get your OST data in PST format.

However, it has been widely seen that this process fails to recover all the data in case of severe OST corruption issues. You need to use professional third-party software to recover data from a severely damaged OST to PST. 

Lepide Exchange Manager is a professional third-party Tool that can be used to perform OST to PST conversion. It can repair severely damaged OST files, and restore data to a new or existing PST.

Here are the steps to perform OST to PST conversion using Lepide Exchange Manager:

  1. 1. Launch Lepide Exchange Manager and add the concerned OST file as Source to the Lepide Exchange Manager. For this, click Add Source and select Offline OST file from options. Click Next and Browse to add the concerned OST file.

You will see that OST file has been added to the left-pane of software. You can expand the source and see all the recovered data within OST.
  1. 2. Now, you need to copy the recovered OST data to a new or existing PST. For this, Click Add Destination and select Create New PST file or Existing PST file from the options as per requirement.
  2. 3. Let’s say you want to create a new PST, so, select Create New PST file option, click Next, specify the location of new PST and click OK.

  3. 4. Copy the entire OST or selected Folders/Messages from OST and paste it to the new PST file.
Now, open the folder where you created the new PST file and you have your OST data in PST format.

Lepide Exchange Manager can tackle severest of OST corruption issues and convert OST to PST without fail in simple-to-follow steps. This is the best tool to rely on when all other methods fail.

Apart from this, software can also be used for major Exchange related functions such as EDB repair, EDB to PST conversion, Exchange Migration, Backup Restoration, Exchange server and backup search, granular message restoration, export and import messages in MSG and EML format etc.For more information - http://www.lepide.com/exchange-manager/restore-ost.html

Monday 22 July 2013

How Can You Accomplish Exchange Server Migration?

MS Exchange Server migration can be best explained as the process of migrating the user mailboxes from an Exchange based system to another Exchange based system. This process simply moves the mailboxes from the source computer to the target computer while sustaining a copy of the data at the original location. 
How to perform migration in Exchange Server?
 
Exchange server migration mainly depends upon the needs and requirements of the organizations along with the version of Exchange they are using. If organizations are using Exchange server 2003, 2007, 2010 versions, then there are three different types of Exchange server migrations that can be opted by the organizations: 


  1. 1. Cutover Exchange Migration (Simple Migration): Such Exchange migration is basically meant for small organizations looking for a quick cutover with no coexistence from their present Exchange environment to Exchange online. It can be used for migrating up to 1,000 Exchange mailboxes.
  2. 2. Staged Exchange Migration: This Exchange server migration is suitable for the organizations that look for a shorter period of coexistence from their present Exchange environment to Exchange online. It allows you to migrate only needed mailboxes to the other Exchange while maintaining other on your current Exchange environment.
  3. 3. Hybrid Deployment Migration: The Hybrid Deployment migration helps you to view the free/busy information for Exchange online users.

Other domains across which the Exchange migration can be performed: 
 
The mailboxes of the an Exchange server database can be migrated to the mailboxes of different file formats such as from Exchange database (EDB) in to PST; EDB of one Live Server to another; OST in to PST, EML, MSG or Live Exchange Server; or offline EDB files to Office 365. Such Exchange server migrations that are mainly requirement centric cannot be performed manually. But, you can successfully perform it by using a professional Exchange migration or Exchange recovery tool like Lepide Exchange Recovery Manager. 


Lepide Exchange Recovery Manager: 
 
Lepide Exchange Recovery Manager is intelligently programmed software for resolving all Exchange server issues along with all Exchange server migrations. It provides you option to add archive mailbox for Live Exchange both in Source and Destination. It also suupports Exchange server 2013 multiple mailboxes and can add multiple Office 365 mailboxes in destination and many more. It now supports Exchange 2013 and MS Outlook 2013. Also, it allows you to extract only required portion of backup from the Exchange backup created through NT, Symantec, HP, VERITAS and CA ARCserve backup. You can restore searched or recovered Exchange server items to Live Exchange Mailboxes, PST, EML, MSG, HTML, RTF or Text file. 
http://www.lepide.com/exchange-manager/
 

How to move Exchange Server 2007 mailboxes of one forest into higher Exchange version?

Exchange mailbox migration becomes significant and certain to manage growing mailbox storage needs of an organization. Microsoft Exchange Server connects all user mailboxes of an organization with a domain. However, every MS Exchange Server version has its own mailbox storage capacity and therefore becomes unstable or slow after crossing the permissible limit. Microsoft has been continuously expanding email storage capacity of MS Exchange Server in the updated version. Putting Exchange mailboxes of an old Exchange Server on the upgraded Exchange version is best option for organizations to get additional storage space and ensure email security compliance. 

Suppose, if your organization is using MS Exchange Server 2007 for email communication. By migrating Exchange mailboxes into higher version such as Exchange Server 2013, you can easily accommodate new users plus protect your crucial business emails from hackers and intruders. All administrative tasks on the Exchange Server 2007 including mailbox migration are performed by Exchange Management Shell. Exchange Management Shell is a part of Exchange Server 2007 Management Console that comprises of a set of Powershell scripts or cmdlets. Using move-mailbox cmdlet, you can export Exchange 2007 mailboxes over different domains of a network. 

But following conditions must be fulfilled before you can move Exchange Server 2007 mailboxes into Exchange Server 2013: 

  • 1. Both Exchange Server 2007 and Exchange Server 2013 must be part of your network
  • 2. You must possess administrative role on both source and target servers
  • 3. You must have access rights of local administrative group of the target server
  • 4. Both source and destination Exchange Servers are listed in the Active Directory list
  • 5. Both source and destination Exchange Servers are running in online mode

Exchange management cmdlet to move mailbox into another server is:

  • get-mailbox –database <old database> | move-mailbox –targetdatabase <new database> -configurationonly:$true

You can also set the mailbox database size limit in the set-mailbox cmdlet for Exchange migration and other tasks. The powershell script line to restrict mailbox database size is:

Set-Mailbox <UserID> -ProhibitSendQuota <Value> -ProhibitSendReceiveQuota <Value> -IssueWarningQuota <Value>

Suppose you specify send limit of the mailbox database to 15 GB in the set-mailbox cmdlet then Exchange mailboxes above 15 GB will not be accessed by users and will show warning messages. You can use set-mailbox and move-mailbox cmdlets in combination also. With set-mailbox cmdlet, you shall be able to export only specific mailboxes of your Exchange Server 2007 organization. However, Exchange mailbox migration with Exchange cmdlets takes considerable time and therefore, it is not suitable for large scale migration. 


Lepide Exchange Server caters the bulk mailbox migration requirements of organizations. This Exchange mailbox migration tool lets organization to move mailboxes into lower or higher Exchange Server. It also export Exchange Server mailboxes to cloud. This Exchange mailbox migration tool also proves beneficial in moving public EDB databases of one forest into the new MS Exchange domain. Read more http://www.lepide.com/exchange-manager/export-multiple-mailboxes.html

How to Restore an Exchange Server by Overwriting an Existing Database?

Consider a situation when your Exchange database is lost or damaged. You have created a backup of Exchange server database which is stored at a safe location. Now, you want to restore your Exchange database from the existing backup copy. You can easily restore it but your current Exchange database may get overwritten by the backup restoration. Before performing the restore process, you must dismount the Exchange databases that you want to restore. If a database that you want to restore is still mounted, the restore process will fail. To make sure that the restore process overwrites Exchange databases, you must configure the Exchange databases that are being restored. 

 
To make more copies of the damaged Exchange database so that you can try to repair it later if essential, there are few important points that you need to take care of. 
 
  • 1.  Determine the location of the Exchange database and log files so that you can move or copy them.


  • 2. Record information from the properties dialog boxes from both the database and the storage group that contains the database. In addition,
  • 3. Preserve the existing Exchange database files before they are overwritten by a copy of Exchange server backup in case of unsuccessful.
Keeping other copies of the damaged Exchange database files allows for more recovery options. 
 
The names of the Exchange storage groups and databases (mailbox stores or public folder stores) must match with the names of the storage groups and databases as they exist as objects in Active Directory for the server to which they are being restored. In case Exchange System Manager is running on any Exchange server in the organization, it will read this data from Active Directory to verify data against the names of the storage groups and databases as they appear in your Exchange backup. If the names do not match, the restore process will fail. 


In case a database or storage group name has changed, you only have to rename the database or storage group to perform this operation. If you are setting up a new server and the database or storage group is missing, you have to create them. Furthermore, you must ensure that the Microsoft Exchange Information Store Service (MSExchangeIS) Is Running. If you are restoring differential and incremental backups, make sure to restore the backups in chronological order. You must restore the normal backup first and then restore any incremental or differential backups in chronological order. After completing Exchange database restoration process, you may find database in an inconsistent state. To make it consistent, you must replay the transaction logs to bring the database up-to-date or make it consistent. 


 Mounting the Exchange database store is the last step in recovering or restoring an Exchange database. Before you mount the store, make sure that the hard recovery has been completed and you can check whether the Restore.env file has been deleted. Restore.env is not deleted until the hard recovery succeeds. 
 
In spite of that, if you are not satisfied with the result then you should look for a professional tool like Lepide Exchange Recovery Manager. It is much capable to fix all Exchange server issues and restoring data from any Exchange backup copy. In fact, it is a multipurpose Exchange recovery software solution that helps you extract only required or complete Exchange database from the existing backup created by NT, Symantec, HP, VERITAS or CA ARCserve backup. Get additional information about restore exchange, please click here : http://www.lepide.com/exchange-manager/restore-from-backup.html

Monday 15 July 2013

Centralized Exchange Server Management for Administrators

Exchange of information and proper functioning of emails is one of the most desired wishes in today’s electronic world. None of the important conversation or project is complete without several exchanges of emails. Every action initiated by MS Outlook, the popular email client, works well in collaboration with MS Exchange. Hence, MS Exchange holds a separate importance where we need to send or receive emails at every minute of the day.


Lepide Exchange Manager is a one in all, highly productive disaster management software that simplifies the entire recovery process and lets the administrator manage everything from a centralized location with ease. All-in-one Lepide Exchange Manager software manages complete exchange disaster recovery and restores backup along with creating reports, performing import and export functions.

Centralized management is one of the most sought after qualities this software possesses. Most of the times, the administrator has to individually perform exchange crash recovery on each employee computer. It gets hectic and time consuming with increasing number of employees. Suppose, there is a group of new employees joining the organization and as soon as they have signed the joining letter they need to have a system and email account for themselves.


In usual scenario, the administrator has to separately create backups of earlier employees and then create a new account. This task gets monotonous, time taking and difficult. With Lepide Exchange Manager, one can manage these trivial yet important tasks from a centralized position. The software offers centralized server and management access to perform entire Exchange Server management tasks along with restoring data from backup. The admin just needs to know the account id and password of each user and manage these tasks from his place.

A couple of essential features of this tool are:
1. Possesses centralized Exchange access and management abilities
2. Accurately performs three important tasks- Exchange recovery, restore mailbox from backup and easy mailbox searching
3. Restores selected or entire mailboxes from backup without implementing brick level backup system
4. Recovers corrupt OST file and restores them in PST or EDB file
5. Transfers mails to newly created mailboxes from PST, OST, EDB and Live Exchange Server
6. Copies un-mounted EDB files to PST or Live Exchange Server
7. Provides easy searching facility to search mailboxes from multiple backups simultaneousl

Lepide Exchange manager effortlessly allows its users to move or copy entire emails from one mailbox or PST file to another. One can export multiple mailboxes from source EDB simultaneously as well. This comes handy when administrator needs to shift an entire mailbox from EDB due to corruption/backup or any other needful purpose.

Due to its numerous qualities, the software is necessary to have in every organization. It is well compatible with all major versions of MS Outlook, MS Exchange Servers and Windows operating systems. Moreover, the software can be downloaded free of cost and analyzed for 30 days. Do not keep waiting for or wasting your precious time in managing Exchange server issues manually, get Lepide Exchange Manager for fast and effective functionalities! Please Visit : http://www.lepide.com/exchange-manager/